Travel shots are not easy to edit as they do not have exact light reflections and exposure. There comes the use of software like Adobe Lightroom. In this lightroom basic master tutorial, we will discuss the lightroom panels. Hence, you know how to edit your travel photographs in Adobe Lightroom to get a professional level of edits.
Lightroom gives you access to all the light and contrast details of an image. In this way, you can now adjust brightness, color scheme, filter settings, contrast, color density, and many more. Light and color properties can be changed using simple-to-use sliders and tools.
Without further due, let’s jump into the tutorial of How To Edit Travel Photographs in Lightroom.
There are three main processes you have to do in Lightroom to get the best editing results.
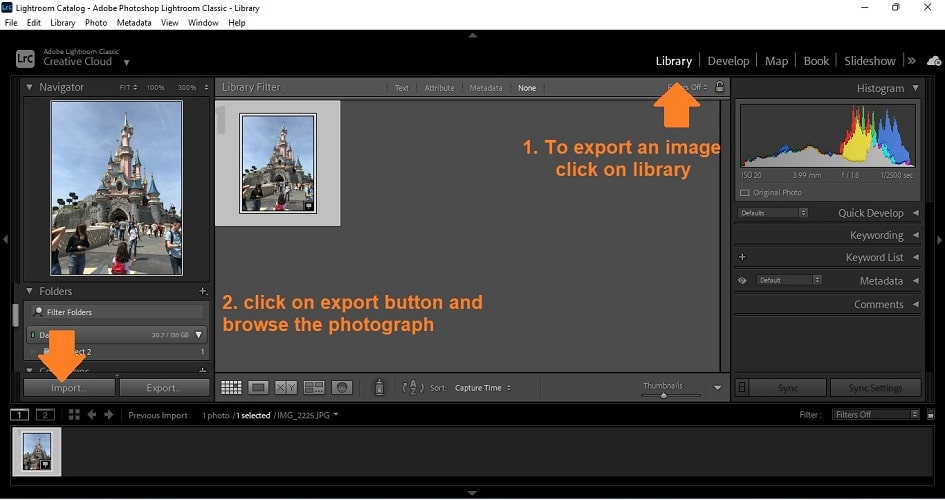
Importing photograph:
Go to the library tab and then click on the import button on the left lower side of the window. Select the file from your device and click import again. The photograph will display in the library tab. To start to edit, click on the developer tab. Now we are going to follow our (CCF) Correction, color, and finishing technique.
1. Color of photograph:
In color, we have to fix the color intensities like brightness and shadows, etc. On the left side of the Lightroom, we can now see color panels with different files like primary, tone curve, HSL, color grading, etc. With the help of these filters, we are going to correct the color scheme of our photograph.
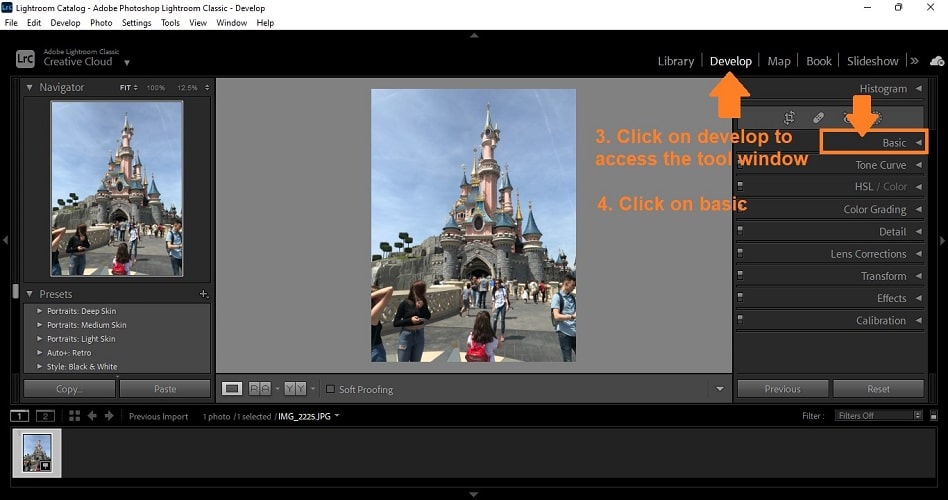
We are going to start from the top and move towards the bottom. First of all, we will adjust the basics of our photograph. This tab contains all the essential color effects that are required to correct our photograph.
Basic:
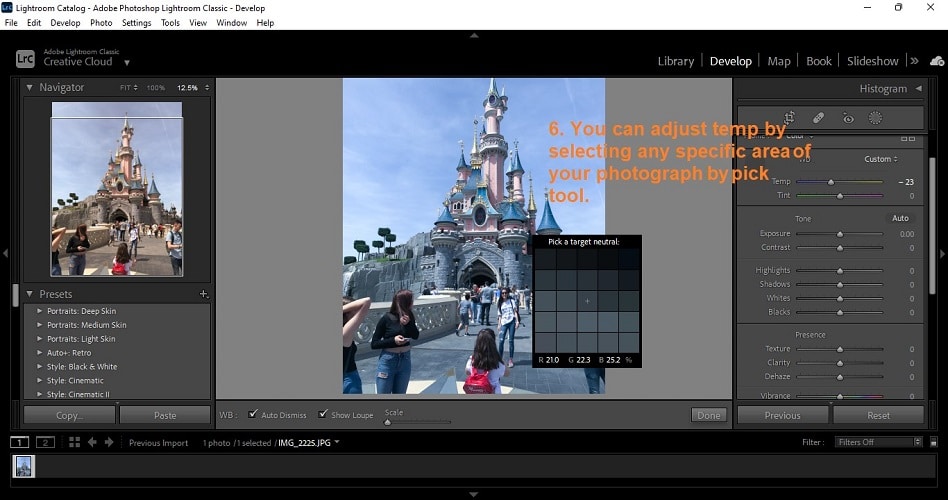
a. Temp & Tint Balance: Temp balance is used to adjust the primary white and blue color balance. It gives the perfect effect of temperature. You can adjust the color of your image according to the season or temperature.
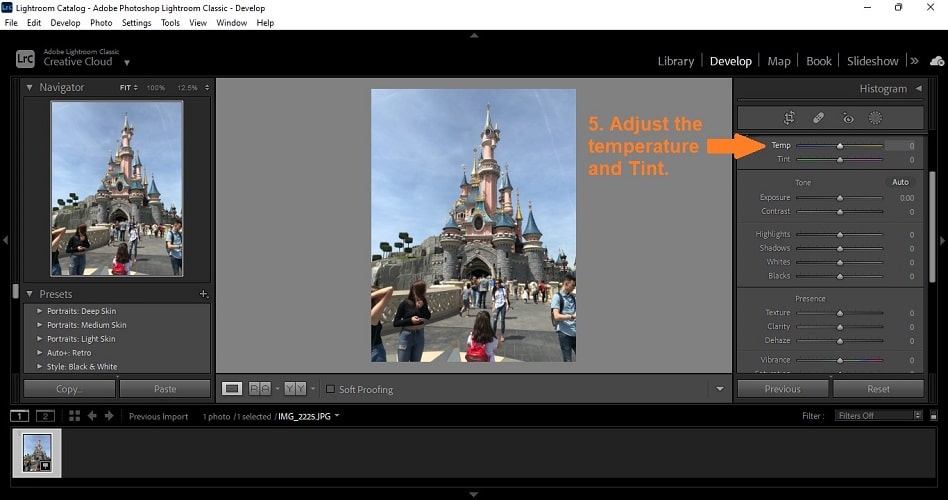
In our case, we are moving the slider from left to right to enhance the blue color. You can also use the color picking tool to adjust the temp. But it is a bit difficult way to do it. The tint is the slider to enhance the green to purple color aspects.
b. Tone: The second column is tone. Here we are going to adjust the exposure, shadows, contrasts, white and black balance. I will lessen the exposure to reduce the excessive light and increase the contrast a bit to enhance the already occurring colors in the photograph.
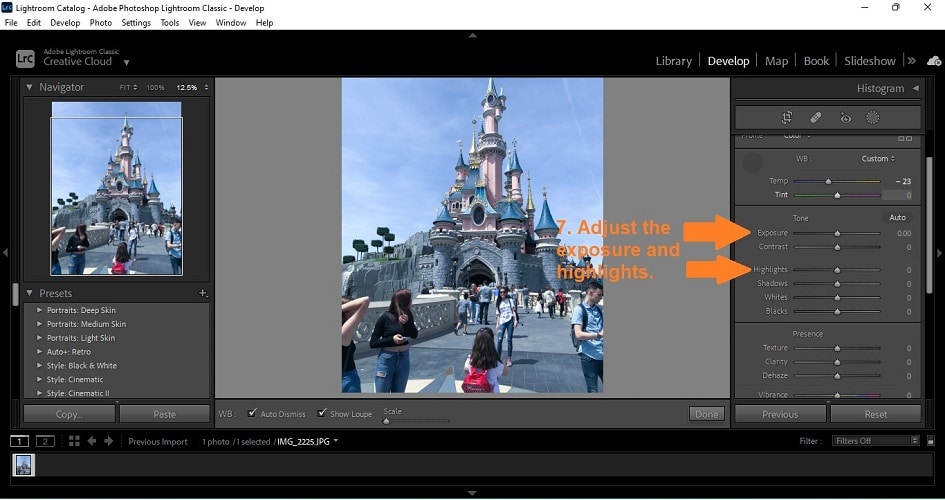
By increasing the shadow, all the dark sides or shades of objects can be adjusted quickly. White balance is the brightness of the photograph, and the dark balance is the shadows.
c. Presence: Presence is the tab containing texture, clarity, saturation, and vibrance. In texture, you can enhance the edges and lines in the photograph. Increase the texture to clear the blurry objects of the image and deal with the grit. Clarity has a slightly different function. It increases the strength of texture by enhancing the dark color of objects.
The saturation slider is to adjust the color saturation in the photograph and bring up all your photo’s colors whether you want them to be prominent or dull. Dehaze is used for the correction of hazy images.
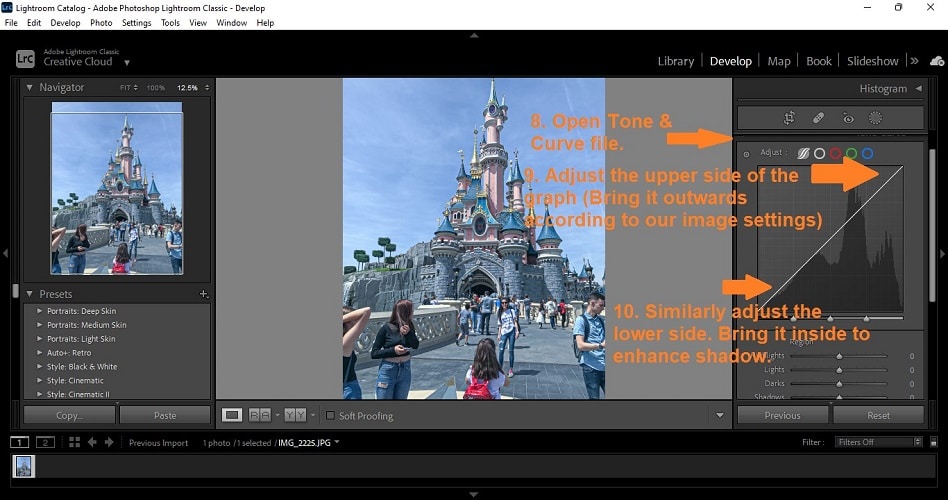
Tone curve:
The tone curve is also a contrast, but you can adjust the highlights and shadows in this curve. In our travel photograph, we will increase our highlights on the top right corner of the curve and bring down the shadows by lowering the left lower corner of the curve, making a slightly S shape.
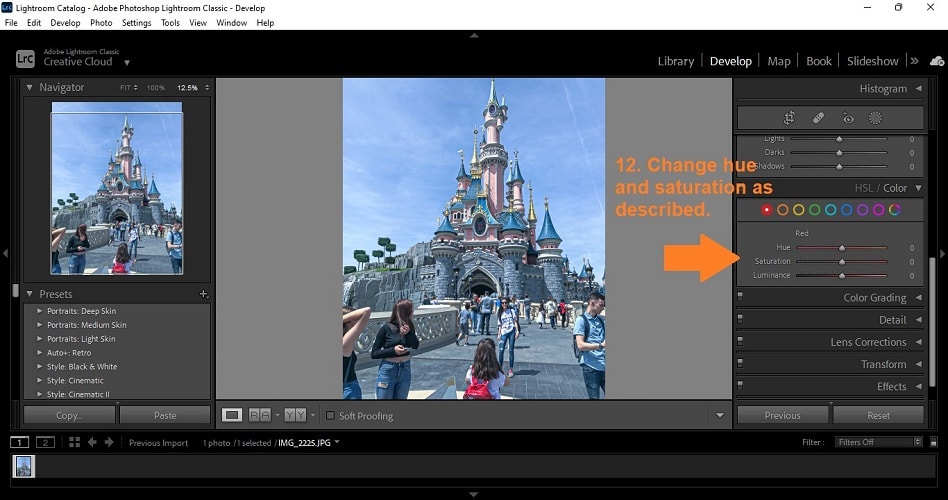
HSL color :
These are the separate RGB and CMYK color adjustments if you want any color to be prominent. So in our photo, every color is in the good vale; we do not have to increase any of them.
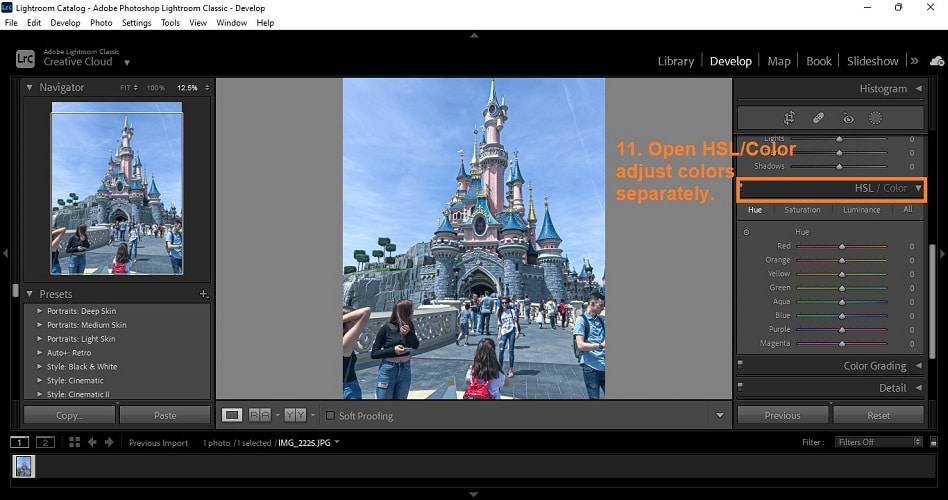
While in the Color tab, you can adjust the saturation hue and luminance of each color separately.
Color grading:
In color grading, you can highlight, enhance saturation or adjust mid-tones of each color separately. If any color has a high luminance value, you can adjust it from this color grading tab.
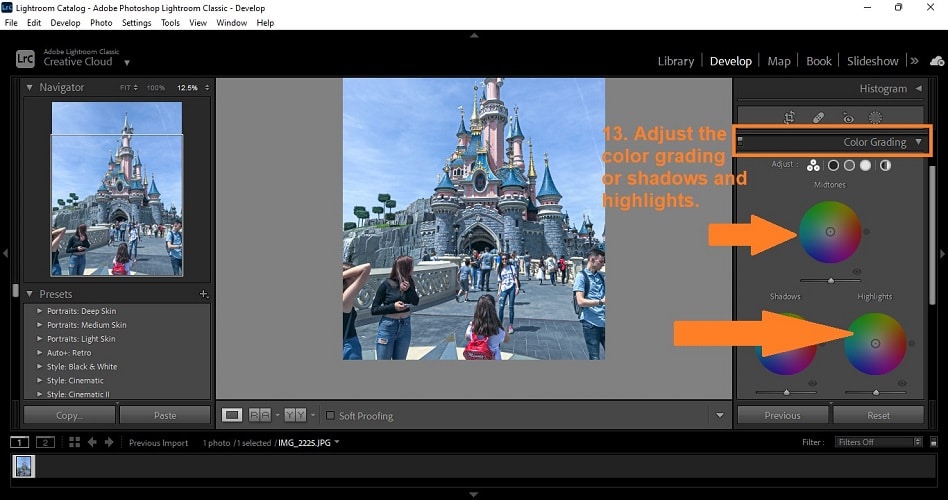
It also has a blending option to blend any selected specific color in the photograph and the balance helps you to maintain the color amount.
Detail:
In detail, you can enhance the sharpness and grit of your photograph. It gives you different options like the radius of the sharpness, detailing the amount, and masking. In travel photos, you need details of objects. That is why we will increase the details a bit.
Lense Correction:
Options in this file are used for the chromatic aberration, which means all the deterioration in the image will be corrected automatically. In comparison, the other Enable profile correction option is used to make the image look like it takes from a specific device like apple, canon, sony, etc.
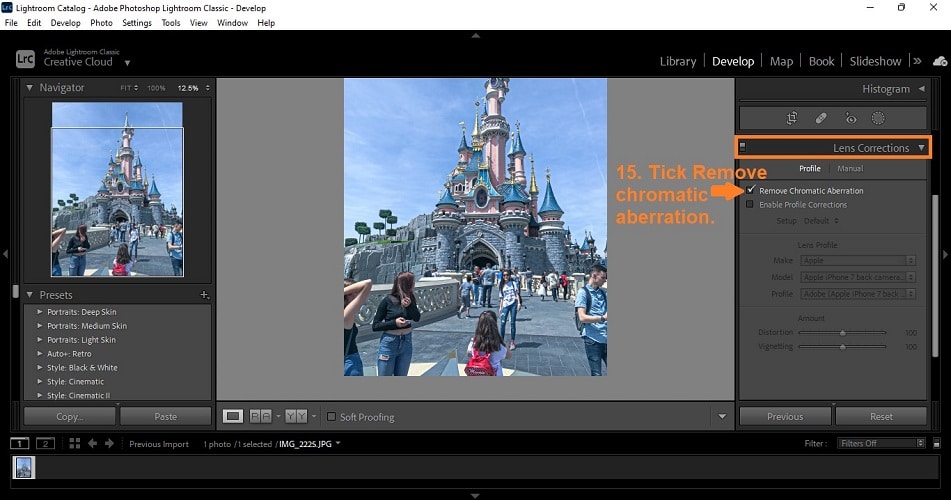
Do not change this option if you are using a professional camera for all your travel photographs.
Transform:
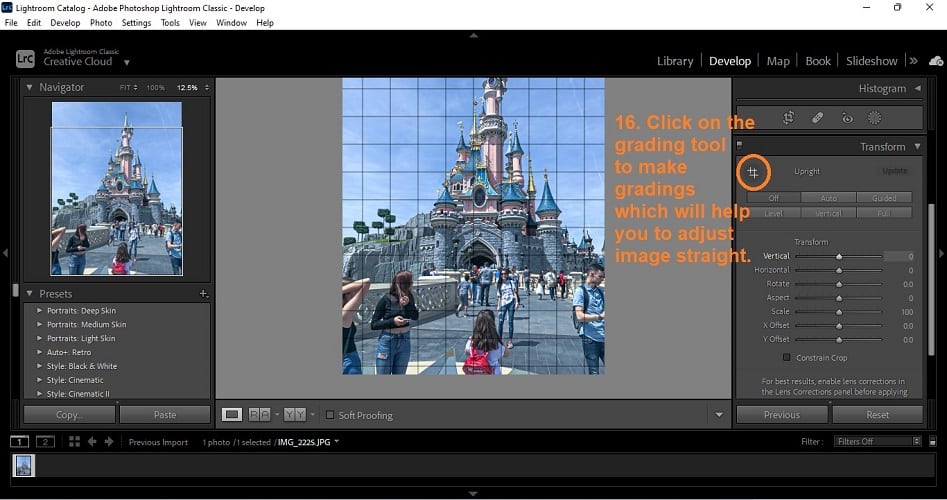
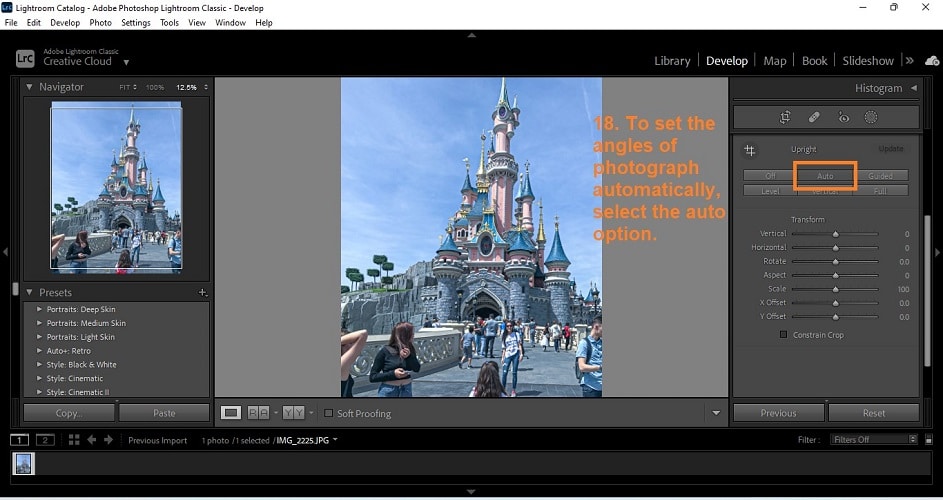
Transform is one of the best options to use while editing your travel photograph. Because if you have any crooked image, you can straighten it right away using vertical, horizontal, and rotationoptions.
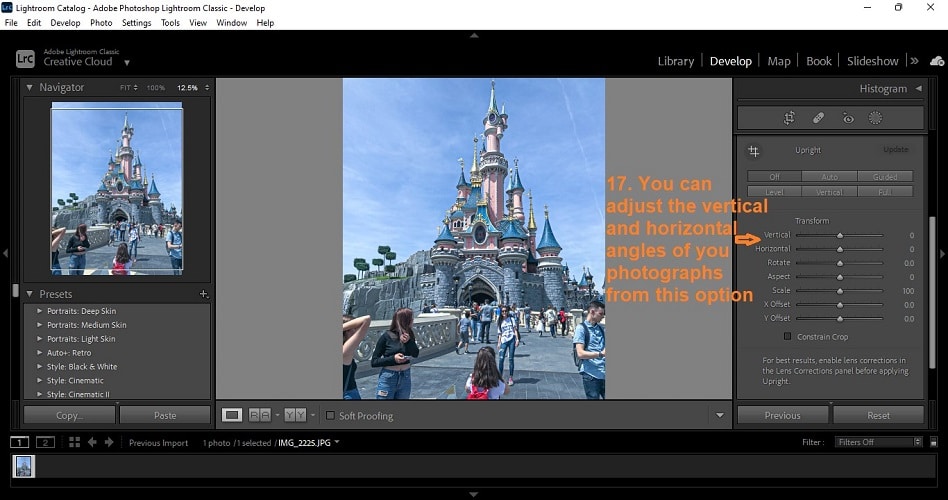
You can also click on auto to make your image correct automatically. It will detect the objects and will correct their angle by rotating the photograph.
Effects:
In the effect section, you can adjust the vignetting means the radius of the image. In which you can adjust the white light and dark lights over the radius of the photograph.
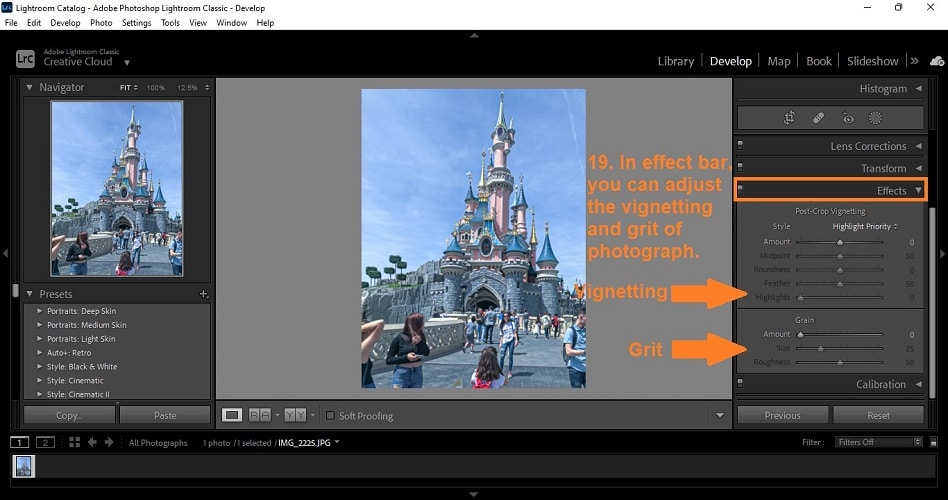
In travel photographs, effects are not necessary to change. You have to show the accurate enhanced colors of your photograph.
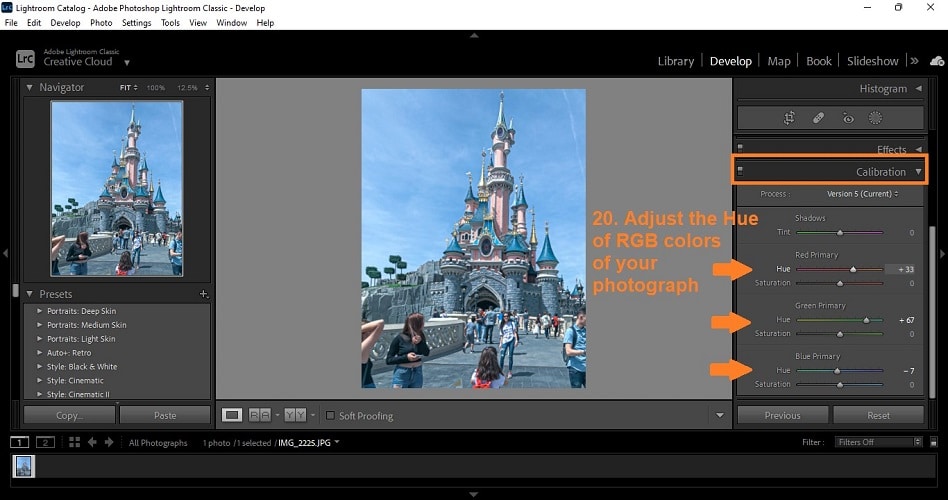
Camera calibration:
In this correction of the photograph, camera calibration is one of the essential aspects. It is the option that changes the color values of the image that could be inside your camera. You can consider it as master settings that deal with everything like colors, brightness, contrasts, etc.
It contains RGB (Red, Green & Blue) colors. In our tutorial image, I am enhancing the red, decreasing the blue, and again enhancing the green. All this must be balanced according to the colors of our photograph.
2. Correction of photograph:
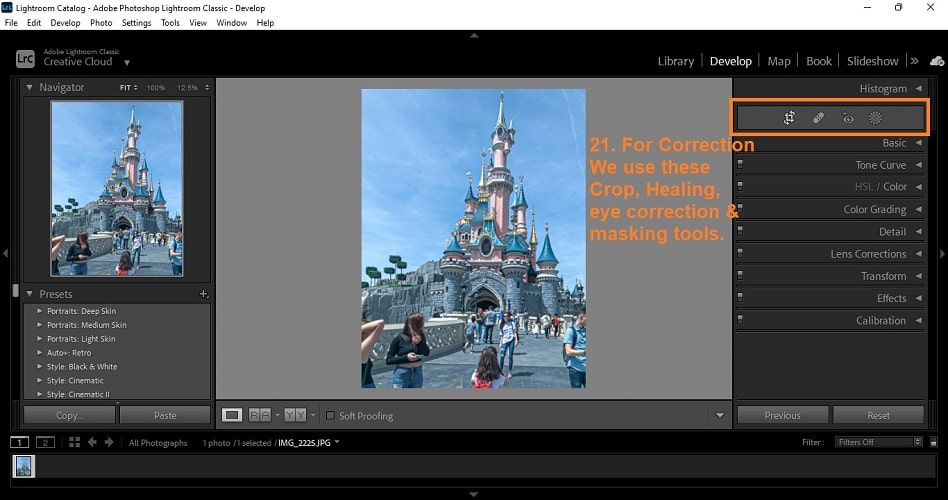
We use the top left corner tools containing cropping, spot removal, red-eye correction, and masking tools for correction.
a. Crop Tool:
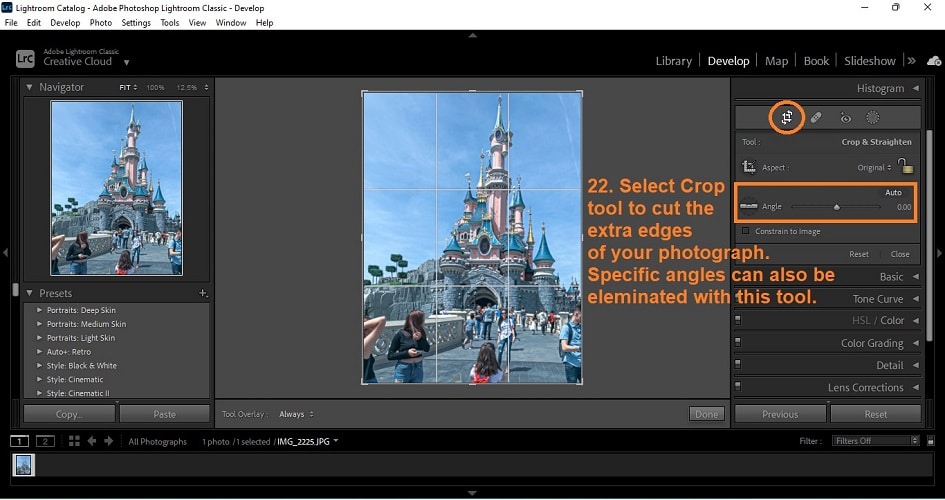
To crop your photographs, select the crop tool or press R. You can crop the image manually by grabbing the sides or crop by putting the angle and ratios into the options shown in the image.
b. Spot healing tool:
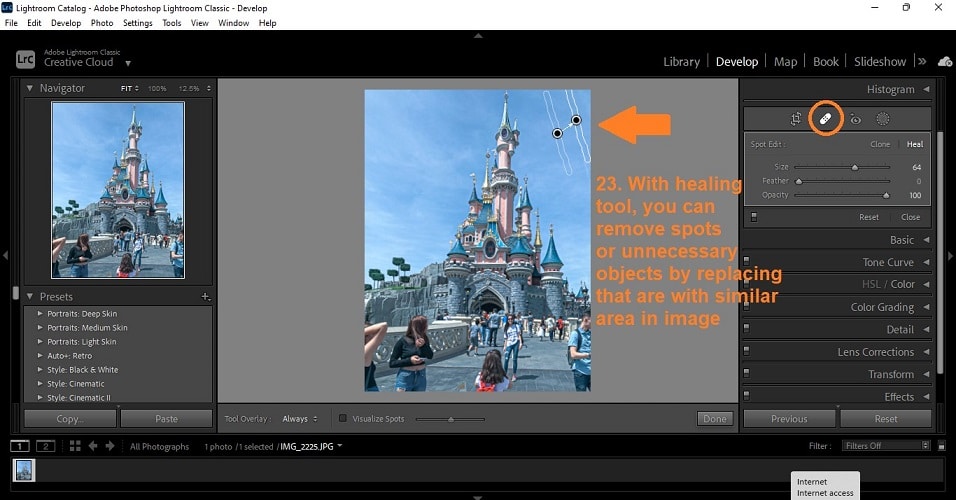
Just like in Photoshop, this tool is used to remove the spots from the photograph. This tool is best for your photos to remove the acne or spots from the skin surface. In the case of a landscape photograph, it isn’t easy to deal with this tool. In our photograph, I have removed the line-shaped cloud from the sky.
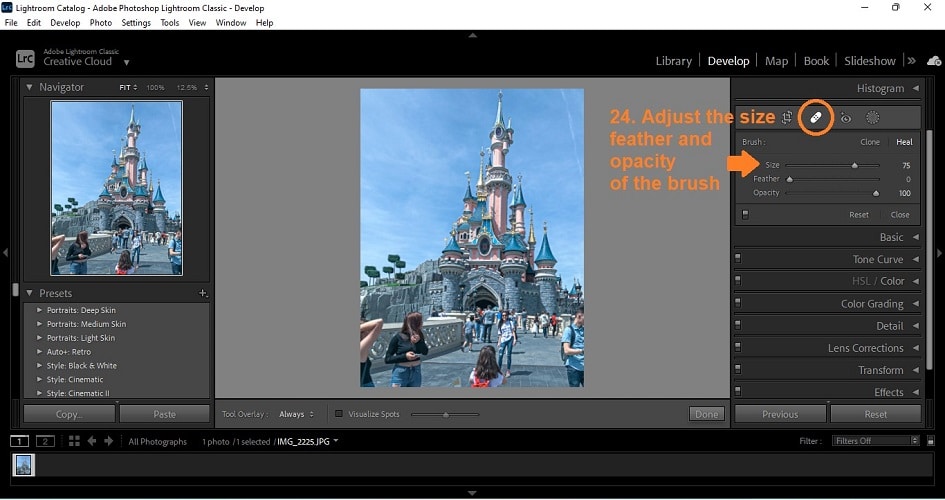
You can manually adjust the size of the brush and the opacity of healing. It will allow you to work on very smaller details with precise and accurate value of healing tool.
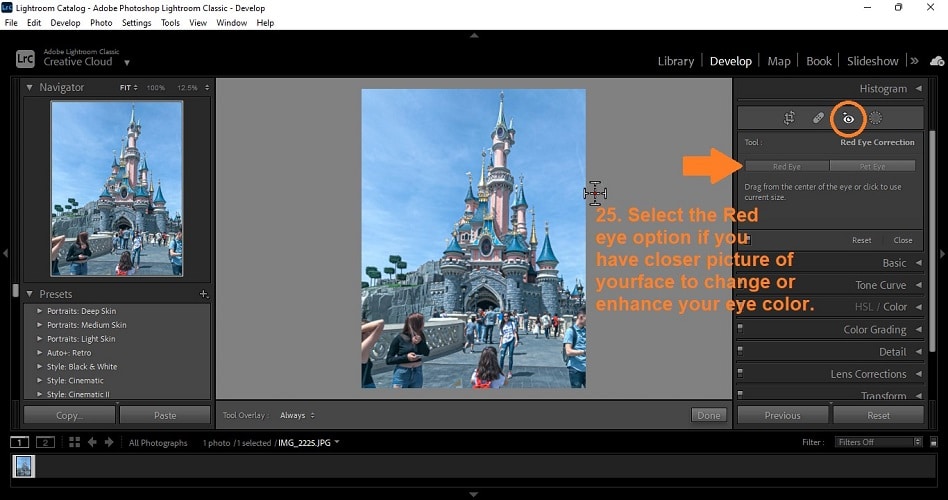
c. Red-eye correction: This option is also used for personal images of photographs containing a close image of your eyes to change the color. In our photograph, we are not going to use this tool.
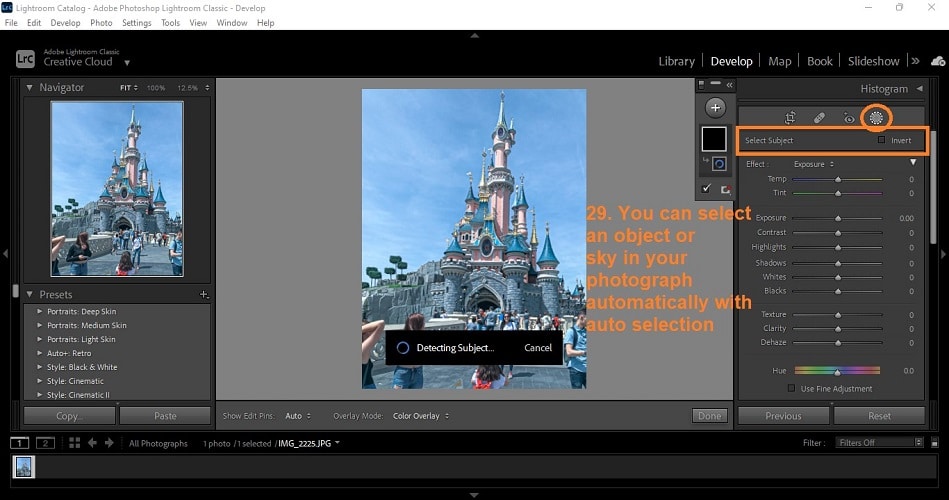
d. Masking tool: Lightroom added this masking tool in the latest version of 2021. This is a beneficial tool to auto-select the sky and combine tools, making masks by luminance colors. In simple words, you can apply gradient brushes, change the color ranges and brightness (Luminance) of your photograph.

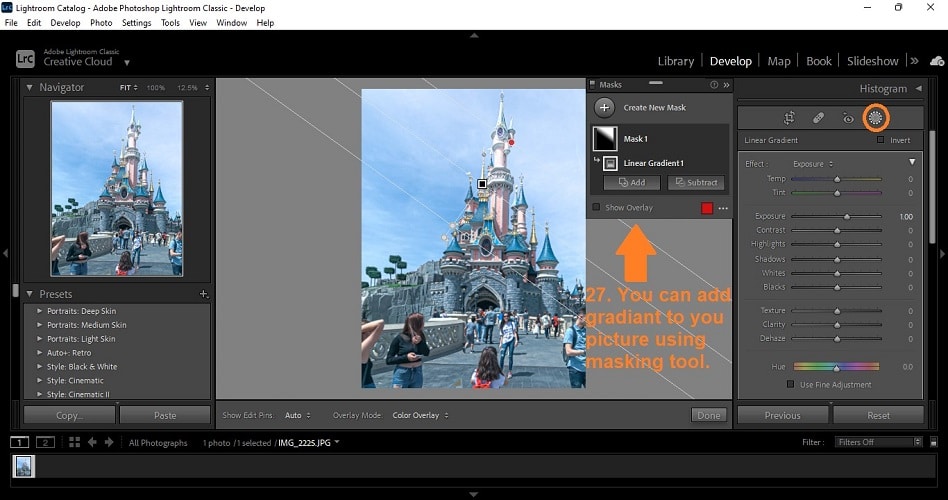
Subject selection and sky selection with this automatic tool are effortless. After selection, you can create a separate mask for colors.
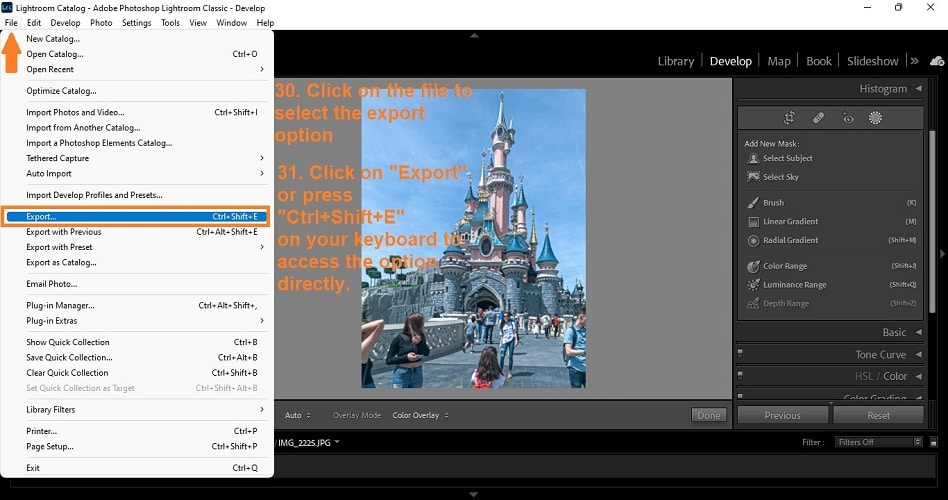
3. Finishing of photograph:
After color and photograph correction, now it’s time to finalize your image by exporting it in your desired format. Lightroom provides you the options to export your image in JPEG, PNG, PSD, TIFF, DNG & your original format, and resolutions.
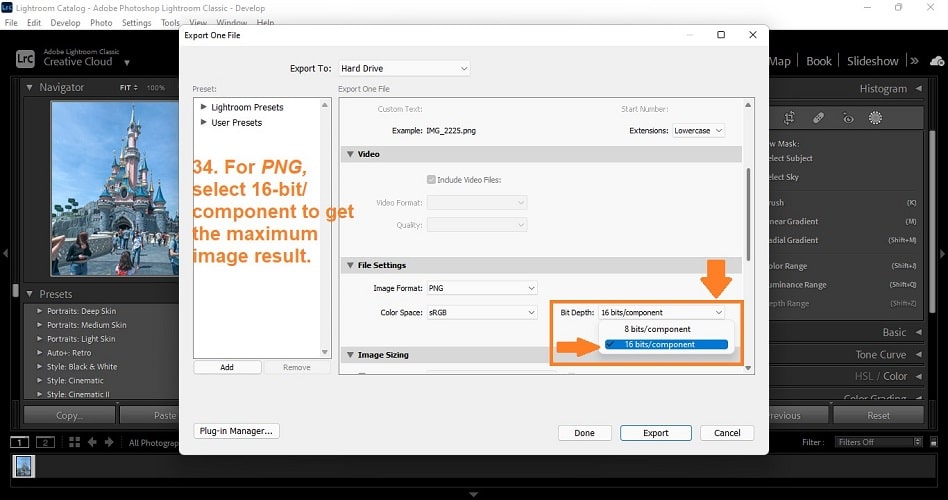
Select the desired format, and according to formate select the quality, e.g., in case of JPEG slide the slider to most right 100% quality and in case of PNG select 16-bit component option for highest
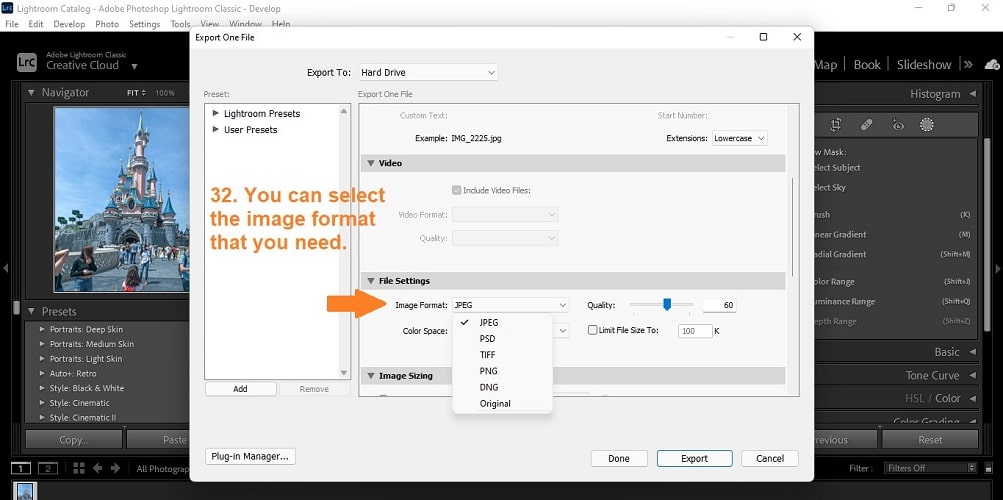
Best export settings for JPEG:

Best export settings for PNG:
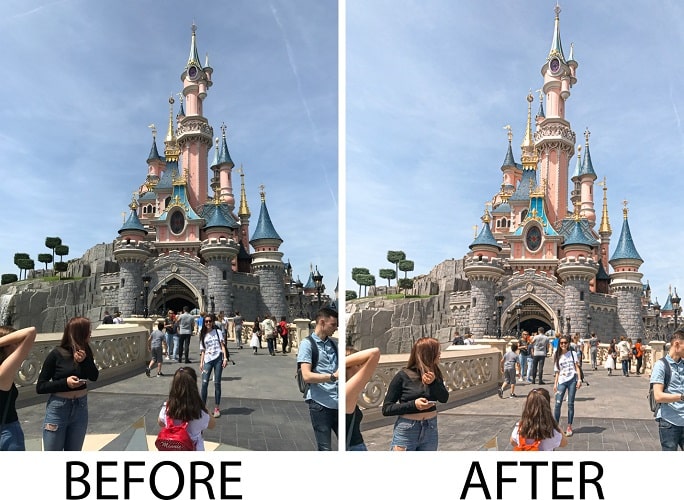
Final results of editing: